RELATED ARTICLES
● How do I manually calibrate my sensor in LabQuest App?
● How do I calibrate a sensor in Logger Pro?
General Information
In most cases it is not necessary to calibrate sensors; however, for optimum accuracy you may choose to calibrate them manually.
To perform any calibration you will need one or more external references for your sensor. For example, to do a two-point calibration for a pH sensor you will need two pH buffer solutions. To calibrate a Force Sensor, you will need two known masses. Your calibration is only as good as your knowledge of the reference values. Note: For best results, the two calibration points should be widely separated and be on either side of the intended readings you anticipate in your experiment.
Depending on the sensor attached, you may have the option of a one-point, two-point, or three-point calibration.
Go Direct Sensors
Performing a Calibration
- Connect the sensor according to the Getting Started section of the product’s user manual (See https://www.vernier.com/til/get-started/go-direct/).
- Click the live readouts meter in the lower right corner and choose Calibrate.
- If applicable, select the type of calibration you wish to initiate from the drop-down menu (for example, one-point calibration, two-point calibration, etc).
- Place the sensor in the first known set of conditions (e.g., known suspended mass or known pH buffer). If using a wet sensor, remove the storage bottle from the sensor (if applicable), rinse the tip of the sensor with distilled water, and place the sensor in the first standard solution so the tip is immersed.
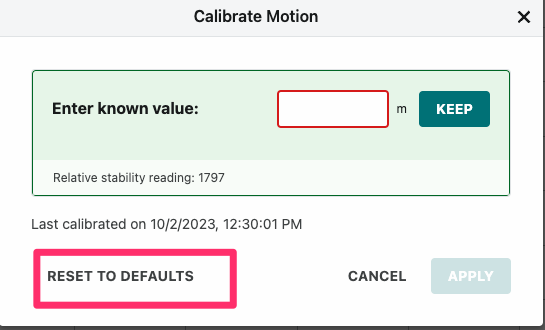
- Type in the first known calibration value in the edit box. When the relative stability reading stabilizes, click Keep. (If performing a one-point calibration, skip to Step 8.)
- Move the sensor to the second set of known conditions. If using a wet sensor, rinse the sensor with distilled water and place it in the second standard solution. The relative stability reading will change.
- Enter the second known calibration value in the edit box. When the relative stability reading stabilizes, click Keep. (If doing a three point calibration, repeat Steps 6 and 7 for a third condition.)
- Click Apply to complete the calibration process.
Storing the Calibration
For Go Direct Sensors, your new calibration is automatically stored to the sensor. No additional action is required.
Restoring the Factory Calibration
- Connect your sensor to Graphical Analysis.
- Click the live readouts meter in the lower right corner and choose Calibrate.
- Select “Reset to Defaults”.
Note: This option only appears if a custom calibration has already been done.

LabQuest (wired) Sensors
Performing a Calibration
- Connect the sensor according to the Getting Started section of the product’s user manual (See https://www.vernier.com/til/get-started/labquest-sensors/)
- Click the live readouts meter in the lower right corner and choose Calibrate.
- If applicable, select the type of calibration you wish to initiate from the drop-down menu (for example, one-point calibration, two-point calibration, etc).
- Place the sensor in the first known set of conditions (e.g., known suspended mass or known pH buffer). If using a wet sensor, remove the storage bottle from the sensor (if applicable), rinse the tip of the sensor with distilled water, and place the sensor in the first standard solution so the tip is immersed.
- Type in the first known calibration value in the edit box. When the voltage reading stabilizes, click Keep. (If performing a one-point calibration, skip to Step 8.)
- Move the sensor to the second set of known conditions. If using a wet sensor, rinse the sensor with distilled water and place it in the second standard solution. The potential (voltage) will change.
- Enter the second known calibration value in the edit box. When the voltage reading stabilizes, click Keep. (If doing a three point calibration, repeat Steps 6 and 7 for a third condition.)
- Click or tap Equation and record the calibration coefficients. You can use this information to apply the calibration to a new data collection file without having to repeat the above steps.
- Click Apply to complete the calibration process.
Storing the Calibration to the Sensor
Calibration storage is not available with LabQuest Sensors in Graphical Analysis. Your custom calibration is not saved with the file or on the sensor. If you recorded the calibration coefficients as noted in Step 8 above, you can follow these steps to use that custom calibration again.
- Connect your sensor to Graphical Analysis.
- Click the live readouts meter in the lower right corner and choose Calibrate.
- Select Equation and enter your recorded calibration coefficients.
- Click Apply to use the custom calibration.
At this time you must use either the LabQuest App or Logger Pro to store a custom calibration to a LabQuest Sensor.
● How do I manually calibrate my sensor in LabQuest App?
● How do I calibrate a sensor in Logger Pro?
Restoring the Previous Calibration
The previous calibration will again be used when starting a new file or disconnecting/reconnecting the sensor.
Related TILs:
- How do I manually calibrate my sensor in LabQuest App?
- How do I manually calibrate my Go Wireless pH or EA in Graphical Analysis GW for iPad or Android?
- How do I calibrate a sensor in Logger Pro?
- How do I store the calibration for my sensor using Logger Pro?
- What is the Relative Stability Reading and how do I use it when calibrating a Go Direct sensor?
- Go Direct Sensor always reads zero (or some other constant value).
